
Azure Cost Optimization for MSPs: 10 Proven Strategies That Save Clients Thousands
By Zoe Montague · Updated · intermediate
As an MSP managing multiple client Azure environments, cost optimization isn’t just about saving money—it’s about demonstrating value and maintaining healthy margins. After years of managing Azure environments for clients, I’ve identified strategies that consistently deliver significant savings.
When you’re managing multiple Azure environments billing can feel like a black box. You set up resources, costs accumulate, and suddenly you’re explaining to a client why their monthly bill changed from last month (Hint: They use storage accounts and brought in a large amount of data to a cold storage account so their write costs were up). I’ve been there with a CFO asking me why this clients Azure bill went up. I’ve had to fix environments that were upside down on their margin. I’ve also been brought in by companies with 6 figure annual spending in Azure to help them optimize and reduce cost without sacrificing performance. The strategies below are what actually worked when I needed to cut costs without cutting corners on performance or reliability.
Why Azure Cost Management Matters for MSPs
Azure costs can spiral quickly without proper governance. A single misconfigured VM or forgotten resource can cost hundreds per month. Multiply that across multiple clients, and you’re looking at thousands in unnecessary expenses.
The MSP Challenge:
- Clients expect you to manage costs effectively
- Your margins depend on efficient resource usage
- Poor cost management reflects badly on your expertise
- Unexpected bills damage client relationships
Strategy 1: Right-Sizing Virtual Machines
The Problem: VMs are often over-provisioned “just in case.”
The Solution: Use Azure Advisor and Monitor to analyze actual usage.
Step-by-Step Right-Sizing Process
Step 1: Identify Candidates
# Get VM size recommendations from Azure Advisor
Get-AzAdvisorRecommendation -Category Cost | Where-Object {$_.ImpactedField -eq "Microsoft.Compute/virtualMachines"}

# Get detailed metrics for specific VM
$vm = Get-AzVM -ResourceGroupName "RG-Production" -Name "VM-AppServer01"
$metrics = Get-AzMetric -ResourceId $vm.Id -MetricName "Percentage CPU" -TimeGrain 01:00:00 -StartTime (Get-Date).AddDays(-30)
Step 2: Analyze 30-Day Utilization
Gather these metrics:
- CPU Usage: Average and peak percentage
- Memory Usage: Available memory and pressure
- Disk I/O: Read/write operations per second
- Network: Bandwidth utilization
Right-Sizing Indicators:
Over-Provisioned (Downsize):
  ├─ CPU: Consistently under 40%
  ├─ Memory: Always >50% free
  ├─ Peaks: Rarely exceed 60%
  └─ Business impact: None if reduced

Properly Sized (No Change):
  ├─ CPU: 40-70% average, peaks to 80-90%
  ├─ Memory: 30-50% free
  └─ Room for growth without waste

Under-Provisioned (Upsize):
  ├─ CPU: Frequently at 80%+
  ├─ Memory: <20% free regularly
  ├─ Performance: Complaints or slow response
  └─ Business impact: User productivity affected
Step 3: Calculate Potential Savings
Example Analysis (as of November 25, 2025):
VM: Standard D4s v3 (4 vCPU, 16 GB RAM)
- Current cost: $175/month
- Average CPU: 15%
- Average Memory: 6 GB used (10 GB free)
- Peak CPU: 35% (rare)
Recommendation: Downsize to D2s v3 (2 vCPU, 8 GB RAM)
- New cost: $88/month
- Monthly savings: $87
- Annual savings: $1,044
- Source: Azure Pricing Calculator
For 10 similar VMs: $10,440/year savings
Step 4: Test in Non-Production First
- Identify test environment equivalents
- Perform downsize during maintenance window
- Monitor for 2 weeks:
- Check application performance
- Verify no resource constraints
- Review user feedback
- Document baseline vs new metrics
- Roll back if issues occur
Step 5: Schedule Production Changes
Change Management:
Pre-Change:
  ├─ Document current performance baseline
  ├─ Schedule during maintenance window
  ├─ Notify stakeholders 7 days in advance
  ├─ Prepare rollback plan
  └─ Snapshot or backup VM (if critical)

During Change:
  ├─ Stop VM (deallocate)
  ├─ Change VM size in Azure Portal
  ├─ Start VM
  └─ Estimated downtime: 5-10 minutes

Post-Change:
  ├─ Verify VM starts successfully
  ├─ Test application functionality
  ├─ Monitor for 2 weeks
  └─ Document actual savings
Step 6: Monitor Post-Change
Set up alerts for:
- CPU >80% for 15 minutes: May need to upsize
- Memory <500 MB available: Potential memory pressure
- Application response time degradation: Performance impact
Real-World Impact:
One MSP client environment audit:
- 25 VMs analyzed
- 18 were over-provisioned
- Average downsize: 1-2 sizes
- Total monthly savings: $1,847
- Annual savings: $22,164
- Implementation time: 4 hours spread over 2 weeks
Common Right-Sizing Scenarios
Scenario 1: Development Servers
- Typical over-provisioning: 50-70%
- Common fix: Downsize 2 tiers
- Additional option: Auto-shutdown outside business hours
Scenario 2: Web Servers
- Typical over-provisioning: 30-50%
- Common fix: Downsize 1 tier
- Additional option: Use auto-scaling for traffic spikes
Scenario 3: File Servers
- Typical over-provisioning: 40-60%
- Common fix: Downsize 1-2 tiers
- Storage note: Ensure storage tier matches I/O needs
Scenario 4: Database Servers
- Approach: More conservative sizing
- Buffer: Keep 30-40% headroom for peaks
- Test thoroughly: Database performance is critical
Action Steps:
- Run monthly right-sizing reports
- Review Azure Advisor recommendations weekly
- Test downsizing in non-production first
- Schedule changes during maintenance windows
- Monitor for 2 weeks post-change
- Document savings for client reports
Strategy 2: SQL Database and Server Optimization
The Problem: SQL databases running on incorrect pricing models or over-provisioned tiers.
Azure SQL offers two purchasing models, and choosing the wrong one costs money:
Understanding the Models
- Predictable pricing based on compute resources
- Best for: Workloads needing consistent performance
- Options: General Purpose, Business Critical, Hyperscale
- Includes: Separate compute and storage scaling
- Typical use: Production databases with known resource needs
- Bundled compute, storage, and I/O
- Best for: Simple pricing, less demanding workloads
- Options: Basic, Standard, Premium tiers
- Includes: Fixed resource bundles
- Typical use: Smaller databases, dev/test environments
How to Right-Size Your SQL Databases
Step 1: Analyze Current Usage
Check your DTU percentage over time in the Azure Portal. The graph shows:
- Blue line: DTU utilization percentage
- Consistent under 40%: You’re over-provisioned
- Frequent spikes to 100%: You’re under-provisioned
- Middle ground (40-80%): Properly sized
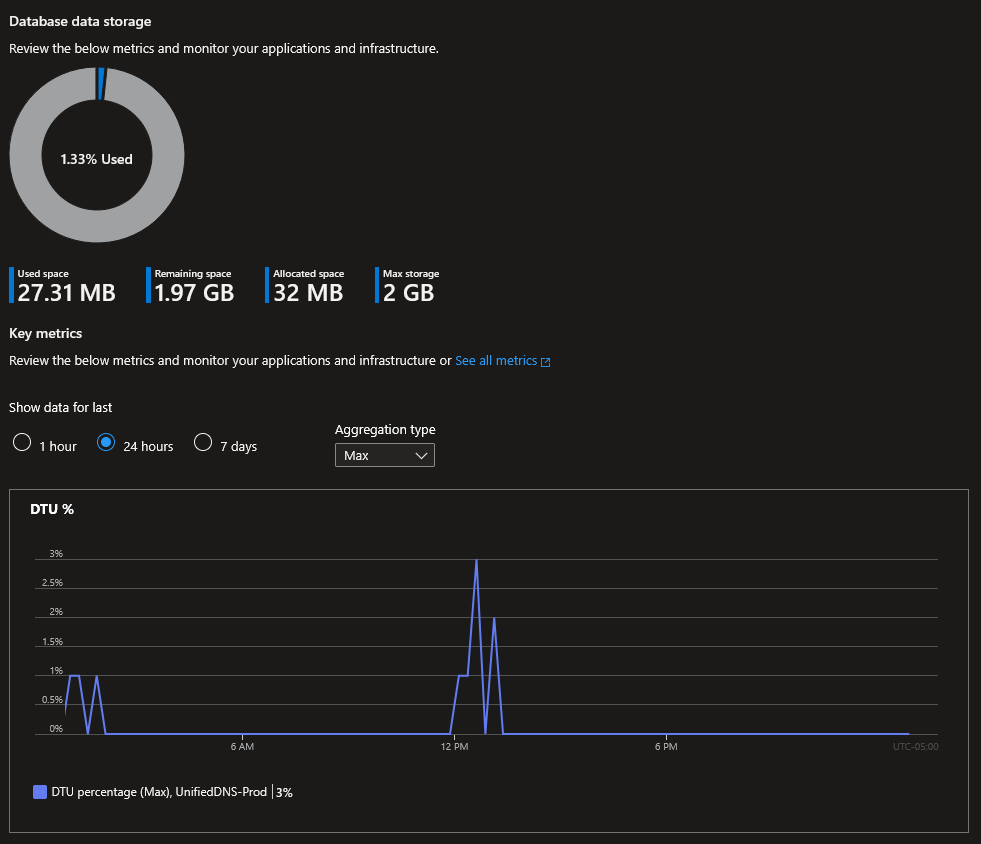 Example: This database shows low utilization, indicating an opportunity to downgrade the tier
Step 2: Review Compute + Storage Separately
For vCore models, check the “Compute + Storage” metrics:
- Data space used: How much storage you’re actually using
- Allocated space: What you’re paying for
- DTU/vCore percentage: CPU and memory usage
If data space used is consistently far below allocated space, you can reduce storage costs.
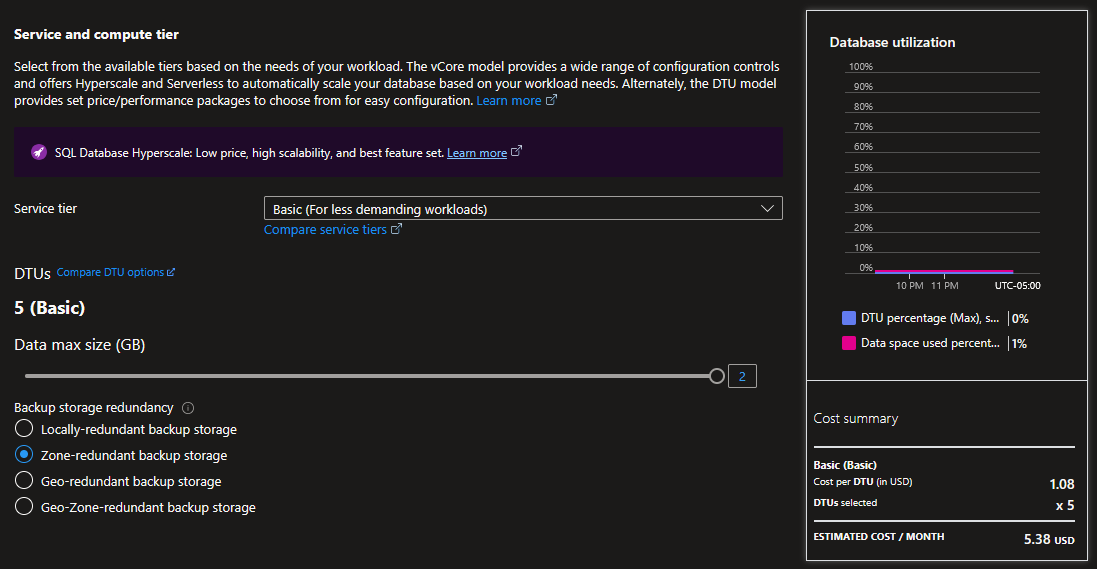 This shows only 1.33% storage used (27.31 MB of 2 GB allocated) - however this is already the lowest tier
Step 3: Choose the Right Model
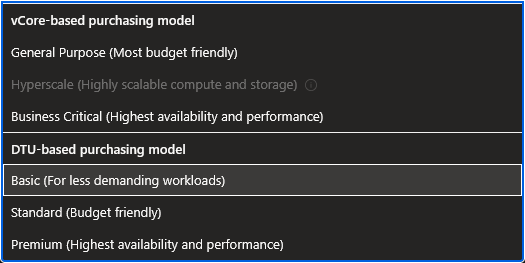 Comparing vCore-based and DTU-based purchasing models
Use this decision tree:
Does the database need:
  ├─ Consistent, predictable performance? → vCore (General Purpose)
  ├─ High availability and performance? → vCore (Business Critical)
  ├─ Rapid scaling capabilities? → vCore (Hyperscale)
  └─ Simple pricing for smaller workload? → DTU (Basic/Standard)
Real-World Example:
A client had a Standard tier database (S2 - 50 DTUs) at $75/month:
- Actual usage: 5-10% DTU consistently
- Storage used: 500 MB of 250 GB
- Solution: Downgraded to Basic tier
- New cost: $5/month
- Monthly savings: $70
- Annual savings: $840
- Pricing as of November 26, 2025 - Azure SQL Database Pricing
Major Assessment Case Study:
During a comprehensive Azure assessment, I discovered a client running a DTU-based P6 SQL database:
- Configuration: 1,000 DTUs, 500 GB storage per database
- Cost: $5/hour ($3,600/month per database)
- The Problem: They were considering upgrading to P11 tier
- Pricing as of November 26, 2025 - Azure SQL Database Pricing
Initial Findings:
-
Peak Usage Pattern:
- Massive DTU spike around 9 AM (employees arriving)
- 20+ hours per day the database was severely over-provisioned
- Consistent under-utilization except for 2-3 hour windows
-
Proposed “Solution” (Before Assessment):
- Client wanted to upgrade to P11 tier
- Cost: $9.40/hour (~$7,000/month)
- Would have increased spending by $3,400/month
My Solution:
-
Analyzed Usage Patterns:
- Pulled 30 days of DTU percentage metrics
- Identified specific peak hours (8:30 AM - 10:30 AM)
- Discovered average usage only needed P4 tier
-
Implemented Auto-Scaling:
- Worked with client’s dev team
- Created automation to scale UP to P6 during peak hours
- Scale DOWN to P4 ($2.50/hour) for remaining 20+ hours
- Used Azure Automation runbooks with schedule triggers
Results:
Before:
  P6 tier 24/7: $5.00/hour × 730 hours = $3,650/month

After Auto-Scaling:
  P6 (3 hours/day): $5.00 × 90 hours = $450/month
  P4 (21 hours/day): $2.50 × 640 hours = $1,600/month
  Total: $2,050/month

Monthly savings: $1,600
Annual savings: $19,200

Prevented P11 upgrade cost: Additional $3,350/month avoided
Total monthly value delivered: $4,950 ($59,400/year)
Key Takeaway: This is why assessments matter. Instead of throwing money at performance issues, we:
- Analyzed actual usage patterns
- Identified the real problem (peak hour spikes)
- Implemented intelligent auto-scaling
- Saved six figures annually
Auto-Scaling Implementation Tips:
-
Gather Data First:
- Minimum 30 days of metrics
- Identify peak hours and days
- Document baseline performance requirements
-
Test Scaling Operations:
- Verify application handles tier changes
- Test during maintenance windows
- Monitor for connection drops
-
Set Appropriate Buffers:
- Scale up 15-30 minutes BEFORE peak
- Scale down 15-30 minutes AFTER peak subsides
- Add buffer for unexpected spikes
-
Monitor and Adjust:
- Review scaling effectiveness monthly
- Adjust schedules as business patterns change
- Set alerts for failed scaling operations
Cost Analysis Tools:
Use the Azure Pricing Calculator to:
- Compare different SQL Database tiers
- Calculate DTU vs vCore costs
- Model auto-scaling scenarios
- Present cost projections to clients
SQL Server Optimization Tips
For SQL Server on VMs (IaaS):
- Use Reserved Instances (see Strategy 3) - up to 55% savings
- Apply Azure Hybrid Benefit - save up to 55% on licensing
- Right-size VM SKUs based on workload patterns
- Enable auto-pause for dev/test servers
- Use Azure SQL Database (PaaS) instead of VMs when possible
Action Steps:
- Review all SQL databases in your client environments
- Check DTU/vCore utilization over the past 30 days
- Identify databases consistently under 40% utilization
- Test downgrades in dev/test first
- Document savings for client reporting
Strategy 3: Reserved Instances and Savings Plans for Stable Workloads
The Problem: Pay-as-you-go pricing for long-running VMs and databases.
Reserved Instances
What are Reserved Instances? Commitment-based pricing where you pay upfront (or monthly) for 1 or 3 years in exchange for significant discounts.
Best for:
- Virtual Machines that run 24/7
- SQL Servers and databases
- Domain controllers
- File servers
- Always-on business applications
Savings:
- VMs: 40-60% compared to pay-as-you-go
- SQL Database: 33-55% depending on tier
- SQL Managed Instance: Up to 55%
Reserved Instance Options:
1-Year Term:
  ├─ Pay upfront: Highest discount
  ├─ Pay monthly: Slight discount reduction
  └─ Flexibility: Exchange for different sizes

3-Year Term:
  ├─ Pay upfront: Maximum discount (up to 72%)
  ├─ Pay monthly: Better than 1-year
  └─ Commitment: Best for stable, long-term workloads
Azure Savings Plans
What are Savings Plans? A newer option offering more flexibility than Reserved Instances. You commit to a fixed hourly spend instead of specific resources.
Key Differences:
| Feature | Reserved Instances | Savings Plans |
|---|---|---|
| Commitment | Specific VM size/region | Dollar amount per hour |
| Flexibility | Limited exchanges | Automatic application |
| Discount | Up to 72% | Up to 65% |
| Best For | Known, stable workloads | Dynamic environments |
| SQL Support | Yes | Yes |
When to Use Savings Plans:
- Multiple VM sizes and types
- Resources in different regions
- Workloads that may change over time
- Compute across VMs, App Service, Container Instances
When to Use Reserved Instances:
- Specific VM configurations that won’t change
- Maximum discount priority
- SQL Databases with stable sizing
- Simple tracking and management
SQL Server Reservations:
For SQL Server (IaaS):
- Reserve VM capacity (40-60% off)
- Apply Azure Hybrid Benefit (additional 55% off licensing)
- Combined savings: Up to 80%
For Azure SQL Database (PaaS):
- Reserve vCores for 1 or 3 years
- General Purpose: 33% (1-year) to 55% (3-year) savings
- Business Critical: Similar savings structure
Real-World Example:
Scenario: Standard D4s v3 VM running SQL Server 24/7 (as of November 26, 2025)
- Pay-as-you-go (with licenses): $1,395/month
- Pay-as-you-go (with Hybrid Benefit): $142/month
- 1-year Reserved (with Hybrid Benefit): ~$100/month (30% additional savings)
- 3-year Reserved (with Hybrid Benefit): ~$80/month (44% additional savings)
- Total savings vs pay-as-you-go with licenses: $1,315/month
- Total 3-year savings: $47,340 over 3 years
- Source: Azure Pricing Calculator - East US region
Key Insight: Combining Reserved Instances + Hybrid Benefit provides the maximum possible savings.
MSP Tip: Create a spreadsheet tracking:
- Client name
- Resource type (VM, SQL DB, etc.)
- Current monthly cost
- Reserved instance/savings plan cost
- Monthly and annual savings
- Reservation expiration date
- ROI timeline
Action Steps:
- Identify VMs and SQL resources running 24/7
- Calculate 1-year vs 3-year savings
- Start with 1-year commitments for new clients
- Use 3-year for stable, long-term relationships
- Set calendar reminders 60 days before expiration
Managing and Canceling Reservations
Critical: Unused Reservations Still Cost Money
Reservations are commitments you pay for whether you use them or not. If a VM is deleted or moved, the reservation continues charging.
Quarterly Reservation Audit:
# Get all reservations
Get-AzReservation | Select-Object ReservationId, ProvisioningState, Quantity, DisplayName, ExpiryDate

# Check reservation utilization
Get-AzReservationSummary -ReservationOrderId "<order-id>" -Grain "daily"
When to Cancel/Exchange:
-
VM Deleted or Migrated:
- Reservation continues charging if not reassigned
- Exchange for different size/region within same family
- Cancel if no longer needed
-
Client Transition Planning:
- Critical: Have a documented plan for what happens to reservations if a client leaves
- Important: If the client owns the Azure subscription, the reservation stays with their subscription when they leave
- Your responsibility: Ensure billing is properly handed off and documented
- Never cancel a reservation on a client-owned subscription without explicit approval
- MSP-owned subscriptions: Different rules apply - manage according to your business model
- Document your reservation ownership model in client contracts
-
Wrong Size/Region:
- Exchange within reservation family (e.g., D-series to different D-series)
- No penalty for exchanges (up to limits)
- Must be same region for most resource types
Cancellation Policy:
Refund Policy:
  ├─ First 12 months: Full pro-rated refund
  ├─ After 12 months: 12% early termination fee
  └─ Refund limit: $50,000 USD per billing profile per year

Exchange Policy:
  ├─ Unlimited exchanges within same reservation family
  ├─ Can split reservations into smaller quantities
  └─ Can merge smaller reservations into larger ones
How to Cancel:
-
Azure Portal (Direct Microsoft Billing):
- Navigate to Reservations
- Select the reservation
- Click “Refund” (if eligible)
- Review pro-rated refund amount
- Confirm cancellation
-
Via CSP/Vendor (e.g., Pax8, other license vendors):
- Important: If the client’s Azure subscription is billed through a Cloud Solution Provider like Pax8, you cannot cancel through the Azure Portal
- Contact your CSP’s support team (e.g., Pax8 Support)
- Provide the following information:
- Reservation name
- SKU (e.g., Standard_D4s_v3)
- Reservation ID
- Reservation Order ID
- CSP will process the cancellation and refund through their system
-
Via Microsoft Support:
- For complex scenarios
- Multiple reservations
- Client migrations
Critical: VM SKU Changes Break Reservations
If you resize a VM to a different SKU family, the reservation does NOT automatically follow:
Example Problem:
- You have a reservation for Standard_D4s_v3
- You change the VM to Standard_E4s_v3 (different family)
- Result: The D4s_v3 reservation continues charging but isn’t being used
- The E4s_v3 VM is now pay-as-you-go
Solution: Exchange the Reservation
- Identify the mismatch (reservation not matching current VM SKU)
- Determine exchange channel:
- Direct Azure billing → Azure Portal
- CSP billing (Pax8, etc.) → Contact CSP support
- Enterprise Agreement → Contact Microsoft Support
- Request exchange with new SKU details
- Important: Exchanging starts a NEW 1-year or 3-year term from the exchange date
- Plan accordingly - don’t exchange unless the VM will stay that size
Exchange Limitations:
- Must be within same reservation family when possible
- Some cross-family exchanges allowed (check current policy)
- Exchange resets the commitment period
- No penalty for exchanges (within limits)
MSP Monitoring Tip:
When you resize VMs, immediately check:
- Does this VM have a reservation?
- Does the reservation match the new SKU?
- If not, initiate exchange immediately
- Update your reservation tracking spreadsheet
MSP Best Practice - Reservation Tracking:
Maintain a detailed spreadsheet:
| Client | Resource | Reservation ID | Start Date | End Date | Monthly Cost | Subscription Owner | Status | Notes |
|---|---|---|---|---|---|---|---|---|
| ClientA | D4s_v3 | res-12345 | 01/15/2024 | 01/15/2025 | $105 | Client | Active | Review Nov 2024 |
| ClientB | SQL DB | res-67890 | 03/01/2024 | 03/01/2027 | $180 | MSP | Active | 3-year commit |
| ClientC | D2s_v3 | res-11111 | 06/01/2024 | 06/01/2025 | $45 | MSP | Active | Multi-tenant resource |
Important Columns:
- Subscription Owner: Track whether client or MSP owns the subscription
- Status: Active, pending renewal, or scheduled for exchange
- Notes: Document any special circumstances or upcoming changes
Set Reminders:
- 60 days before expiration: Review renewal needs
- Quarterly: Audit all reservations for utilization
- Monthly: Check for VMs deleted but reservations still active
- When resizing VMs: Immediately review and exchange reservations if needed
Strategy 4: Auto-Shutdown for Development/Test
The Problem: Dev/test VMs running 24/7 when only needed 8 hours/day.
The Solution: Implement auto-shutdown schedules:
# Set auto-shutdown for VM
$vm = Get-AzVM -ResourceGroupName "RG-DevTest" -Name "VM-DevTest01"
Set-AzVMAutoShutdownSchedule -ResourceGroupName $vm.ResourceGroupName -VMName $vm.Name -Enabled $true -Time "18:00" -TimeZone "Eastern Standard Time"
Real-World Impact:
Example (as of November 26, 2025): Standard D2s v3 VM for development
- Size: 2 vCPUs, 8 GB RAM
- Pay-as-you-go rate: $96.36/month (24/7)
- Hourly rate: $0.133/hour
- Source: Azure Pricing Calculator
Calculation:
Current usage (24/7):
  24 hours/day × 30 days = 720 hours/month
  720 hours × $0.133 = $96.36/month

With auto-shutdown (8 hours/day, M-F only):
  8 hours/day × 22 business days = 176 hours/month
  176 hours × $0.133 = $23.41/month

Monthly savings: $72.95 (76% reduction)
Annual savings: $875.40
For 10 dev VMs: $7,294/year in savings
Business Days Only Strategy:
- Monday-Friday: Auto-start 7 AM, auto-shutdown 6 PM
- Weekends: Completely off
- Total running time: ~176 hours/month vs 720 hours
- Cost reduction: 76%
Strategy 5: Delete Orphaned Resources
The Problem: Resources left behind after VM deletions.
Common Culprits:
- Unattached disks: $5-50/month each (actual cost impact)
- Unused public IPs: $3-4/month each (actual cost impact)
- Old snapshots: $1-20/month each (actual cost impact)
- Empty resource groups: No direct cost, but impacts organization
- Unattached NICs: No direct cost, but creates management clutter
Why This Matters:
While resource groups and NICs don’t incur direct costs, keeping your environment clean helps with:
- Cost visibility: Easier to track what you’re actually paying for
- Management: Less clutter when navigating resources
- Security: Reduce attack surface by removing unused components
- Governance: Stay organized and maintain best practices
Monthly Audit Script:
# Find unattached disks (COST IMPACT)
Get-AzDisk | Where-Object {$_.ManagedBy -eq $null}

# Find unused public IPs (COST IMPACT)
Get-AzPublicIpAddress | Where-Object {$_.IpConfiguration -eq $null}

# Find old snapshots (COST IMPACT - older than 90 days)
Get-AzSnapshot | Where-Object {$_.TimeCreated -lt (Get-Date).AddDays(-90)}

# Find unattached NICs (MANAGEMENT CLEANUP)
Get-AzNetworkInterface | Where-Object {$_.VirtualMachine -eq $null}

# List empty resource groups (MANAGEMENT CLEANUP)
Get-AzResourceGroup | Where-Object {(Get-AzResource -ResourceGroupName $_.ResourceGroupName).Count -eq 0}
Real-World Example:
One client environment cleanup:
- 12 unattached disks: $180/month
- 8 unused public IPs: $28/month
- 45 old snapshots: $90/month
- 15 unattached NICs: $0/month (but improved management)
- 6 empty resource groups: $0/month (but improved organization)
Total monthly savings: $298 ($3,576/year) Added benefit: Cleaner, more manageable environment
Strategy 6: Use Azure Hybrid Benefit
The Problem: Paying for Windows Server and SQL Server licenses in Azure when clients already own them.
The Solution: Apply Azure Hybrid Benefit for:
- Windows Server VMs: Save up to 40%
- SQL Server: Save up to 55%
- Azure SQL Database: Save up to 55%
Requirements:
- Active Software Assurance or subscription licenses
- Proper licensing documentation
- Compliance with Microsoft licensing terms
⚠️ CRITICAL LICENSING WARNING:
Only enable Azure Hybrid Benefit if the client actually owns proper, legitimate, and active licenses for Windows Server or SQL Server with active Software Assurance or subscription licenses. Enabling Hybrid Benefit without proper licensing is a license violation and can result in:
- Microsoft audit findings
- Retroactive charges
- License penalties
- Legal complications
Your Responsibility: Verify and document license ownership before applying Hybrid Benefit. When in doubt, consult with Microsoft licensing experts or your Microsoft account team.
Learn More:
Microsoft’s official Azure Hybrid Benefit documentation:
- Windows Server - Licensing requirements and implementation
- Linux - RHEL and SLES licensing benefits
- SQL Server - SQL Server licensing and Azure SQL benefits
How to Apply:
# Enable Hybrid Benefit for Windows VM
$vm = Get-AzVM -ResourceGroupName "RG-Production" -Name "VM-WinServer01"
$vm.LicenseType = "Windows_Server"
Update-AzVM -ResourceGroupName $vm.ResourceGroupName -VM $vm

# Enable Hybrid Benefit for SQL Server VM
$sqlVm = Get-AzSqlVM -ResourceGroupName "RG-Production" -Name "VM-SQLServer01"
$sqlVm.LicenseType = "AHUB"
Update-AzSqlVM -ResourceGroupName $sqlVm.ResourceGroupName -SqlVM $sqlVm
Real-World Savings:
Windows Server Example (as of November 26, 2025):**
- Standard D4s v3 VM (East US): $140/month (pay-as-you-go with Windows license)
- With Hybrid Benefit: $84/month
- Monthly savings: $56
- Annual savings: $672
- Source: Azure Pricing Calculator
SQL Server Example (as of November 26, 2025):**
- Standard D4s v3 VM (East US): $1.87/hour base compute
- Without Hybrid Benefit (licenses included):
- Pay-as-you-go with SQL Server Enterprise + Windows: ~$1,395/month
- With Hybrid Benefit (bring your own licenses):
- Pay-as-you-go with both OS and SQL licenses applied: ~$142/month
- Monthly savings: $1,253
- Annual savings: $15,036
- Source: Azure Pricing Calculator - East US region
Note: The massive savings on SQL Server demonstrates why license inventory is critical for MSPs. Clients with Software Assurance should always use Hybrid Benefit.
MSP Best Practices:
-
License Inventory: Maintain a spreadsheet tracking:
- Client name
- License type (Windows Server, SQL Server)
- Number of licenses owned
- Software Assurance expiration dates
- Azure resources using Hybrid Benefit
-
Compliance Check: Verify licenses quarterly
-
Documentation: Keep license proof on file
-
Client Communication: Show savings on monthly reports
Important: Hybrid Benefit requires proper, legitimate, active licensing with Software Assurance. Never apply it without confirming the client has eligible licenses and maintaining documentation. License compliance is YOUR responsibility as the MSP.
Strategy 7: Implement Budgets and Alerts
The Problem: No visibility until the bill arrives.
The Solution: Set up proactive monitoring:
- Create budgets per resource group or subscription
- Set alerts at 50%, 75%, 90%, 100%
- Route alerts to your PSA/ticketing system
- Review anomalies weekly
MSP Best Practice: Budget per client environment, not per subscription.
Strategy 8: Storage Tiering Strategy
The Problem: All data in hot storage when cool/archive would work.
Storage Tier Pricing (Central US - Block Blob Storage):
Based on Azure pricing for LRS (Locally Redundant Storage) as of November 26, 2025:
| Tier | Per GB/Month | Best For | Data Retrieval Cost |
|---|---|---|---|
| Hot | $0.0184 | Frequently accessed data | Free |
| Cool | $0.0115 | Infrequently accessed (30+ days) | $0.01 per GB |
| Archive | $0.00099 | Rarely accessed (180+ days) | $0.02 per GB + rehydration time |
Source: Azure Storage Pricing
Savings Example:
For 1 TB (1,000 GB) of backup data:
Hot Tier:
  1,000 GB × $0.0184 = $18.40/month

Cool Tier:
  1,000 GB × $0.0115 = $11.50/month
  Monthly savings: $6.90 (37.5% reduction)
  Annual savings: $82.80

Archive Tier:
  1,000 GB × $0.00099 = $0.99/month
  Monthly savings: $17.41 (94.6% reduction)
  Annual savings: $208.92
Important Considerations:
- Retrieval costs apply when accessing cool/archive data
- Archive rehydration can take several hours
- Minimum storage duration: Cool = 30 days, Archive = 180 days
- Early deletion fees apply if removed before minimum duration
Transaction Costs Vary by Tier (as of November 26, 2025):**
Each tier has different costs for operations:
| Operation Type | Hot Tier | Cool Tier | Archive Tier |
|---|---|---|---|
| Write operations (per 10,000) | $0.065 | $0.13 | $0.13 |
| Read operations (per 10,000) | $0.0044 | $0.01 | $5.50 |
| List operations (per 10,000) | $0.065 | $0.13 | $0.65 |
| Data retrieval (per GB) | Free | $0.01 | $0.02 |
Source: Azure Storage Pricing
Critical: Archive tier has expensive read operations ($5.50 per 10,000) and requires rehydration time. Only use archive for data you rarely or never access.
Real-World Impact:
If you move frequently-accessed data to Cool or Archive to save on storage costs, you may end up paying more in transaction costs:
- Bad scenario: 1 TB in Cool tier, accessed 100 times/day
- Storage savings: $6.90/month
- Transaction costs: Could exceed savings
- Good scenario: 1 TB in Cool tier, accessed 2-3 times/month
- Storage savings: $6.90/month
- Transaction costs: Minimal
- Net savings maintained
Use Cases:
| Storage Tier | Ideal Data Types | Access Frequency |
|---|---|---|
| Hot | Active databases, application data, frequently used files | Daily/hourly |
| Cool | Recent backups (30-90 days), logs, dev/test data | Monthly |
| Archive | Compliance backups, historical records, old projects | Rarely or never |
Lifecycle Management Policy:
⚠️ CRITICAL: Test Before Production!
Do NOT run lifecycle policies blindly. Always:
- Test on non-critical data first
- Verify the policy logic
- Understand rehydration requirements
- Document data access patterns
- Review monthly to ensure policies still make sense
{
  "rules": [
    {
      "name": "MoveToCool",
      "enabled": true,
      "type": "Lifecycle",
      "definition": {
        "filters": {
          "blobTypes": ["blockBlob"],
          "prefixMatch": ["backups/"]
        },
        "actions": {
          "baseBlob": {
            "tierToCool": {
              "daysAfterModificationGreaterThan": 30
            },
            "tierToArchive": {
              "daysAfterModificationGreaterThan": 180
            },
            "delete": {
              "daysAfterModificationGreaterThan": 365
            }
          }
        }
      }
    }
  ]
}
Implementation Steps:
-
Analyze current storage usage:
# Get storage account statistics Get-AzStorageAccount | ForEach-Object { $metrics = Get-AzMetric -ResourceId $_.Id -MetricName "UsedCapacity" [PSCustomObject]@{ Account = $_.StorageAccountName UsedGB = [math]::Round($metrics.Data[-1].Average / 1GB, 2) } } -
Identify data access patterns (check last accessed times)
-
Create test lifecycle policy on non-critical container
-
Monitor for 30 days to verify expected behavior
-
Expand to production after verification
-
Set calendar reminder to review quarterly
MSP Best Practice:
Create a tiering decision matrix for clients:
Data Type Decision Tree:
  ├─ Accessed daily? → Hot
  ├─ Accessed monthly? → Cool
  ├─ Compliance/archive only? → Archive
  └─ Not needed after X months? → Delete (with lifecycle)
Real-World Savings:
One client with 10 TB of backup data:
- Before: All in Hot tier = $184/month
- After tiering:
- 1 TB Hot (current backups): $18.40
- 3 TB Cool (30-180 days): $34.50
- 6 TB Archive (180+ days): $5.94
- New total: $58.84/month
- Monthly savings: $125.16
- Annual savings: $1,501.92
Strategy 9: Monitor and Eliminate Waste
Weekly Cost Review:
- Check Cost Analysis in Azure Portal
- Group by Resource Type
- Sort by cost descending
- Investigate top 10 resources
Questions to Ask:
- Is this resource still needed?
- Is it properly sized?
- Can it be scheduled/shutdown?
- Is there a cheaper alternative?
Strategy 10: Use Tags for Cost Allocation
The Problem: Can’t attribute costs to specific clients/departments.
Tagging Strategy:
# Example tag structure
@{
    "Client" = "ClientName"
    "Environment" = "Production"
    "CostCenter" = "IT-Operations"
    "Owner" = "Primary Contact"
    "Project" = "ProjectName"
}
MSP Tip: Enforce tagging via Azure Policy for all new resources.
Creating Your Cost Optimization Schedule
Important Note: This schedule is a recommendation for establishing your Azure cost management practices. Once your Azure line of business is stable and you have consistent processes in place, you can absolutely adjust these frequencies to longer periods based on your specific needs and client stability.
Weekly:
- Check alerts and budgets
- Review any cost spikes or anomalies flagged by alerts
Monthly:
- Full cost analysis review
- Review cost anomalies and investigate variances
- Verify auto-shutdown schedules are working
- Right-sizing recommendations
- Orphaned resource cleanup
- Client cost reports
- Check for VMs deleted but reservations still active
Quarterly:
- Reserved instance evaluation and utilization review
- Storage tiering review
- Tag compliance audit
- License optimization (Hybrid Benefit)
- Audit all reservations for utilization
- Review and adjust optimization schedule as needed
60 Days Before Reservation Expiration:
- Review renewal needs
- Calculate ROI of renewal vs pay-as-you-go
- Present options to client
Need Help Implementing This?
Cost optimization requires ongoing attention and expertise. If you need help:
- Setting up cost governance
- Right-sizing client environments
- Implementing monitoring and alerts
- Creating client cost reports
Schedule a consultation and let’s discuss your specific situation.
Getting Started This Week
Your Action Items for This Week:
- Day 1-2: Read through all 10 strategies and take notes
- Day 3: Pull cost reports for your top 3 highest-spend clients
- Day 4: Identify one quick win per client (likely orphaned resources)
- Day 5: Schedule kickoff meeting with your team to assign roles
Remember: Cost optimization is a journey, not a destination. Start small, build momentum with quick wins, then expand to more sophisticated strategies. Your clients will appreciate the proactive approach and documented savings.
Remember: Every dollar you save your clients strengthens your relationship and improves your margins. Cost optimization isn’t a one-time project—it’s an ongoing process that demonstrates your value as their MSP.
Sources
- Azure Cost Management and Billing Documentation (Microsoft)
- Azure Pricing Calculator (Microsoft)
- Azure Advisor Cost Recommendations (Microsoft)
- Azure Hybrid Benefit - Windows Server (Microsoft)
- Azure Hybrid Benefit - Linux (Microsoft)
- Azure Hybrid Benefit - SQL Server (Microsoft)
- Azure SQL Database Pricing (Microsoft)
- Azure SQL Database Purchasing Models (Microsoft)
- Azure SQL Database - vCore Service Tiers (Microsoft)
- Azure SQL Database - DTU Service Tiers (Microsoft)
- Azure Storage Pricing (Microsoft)